
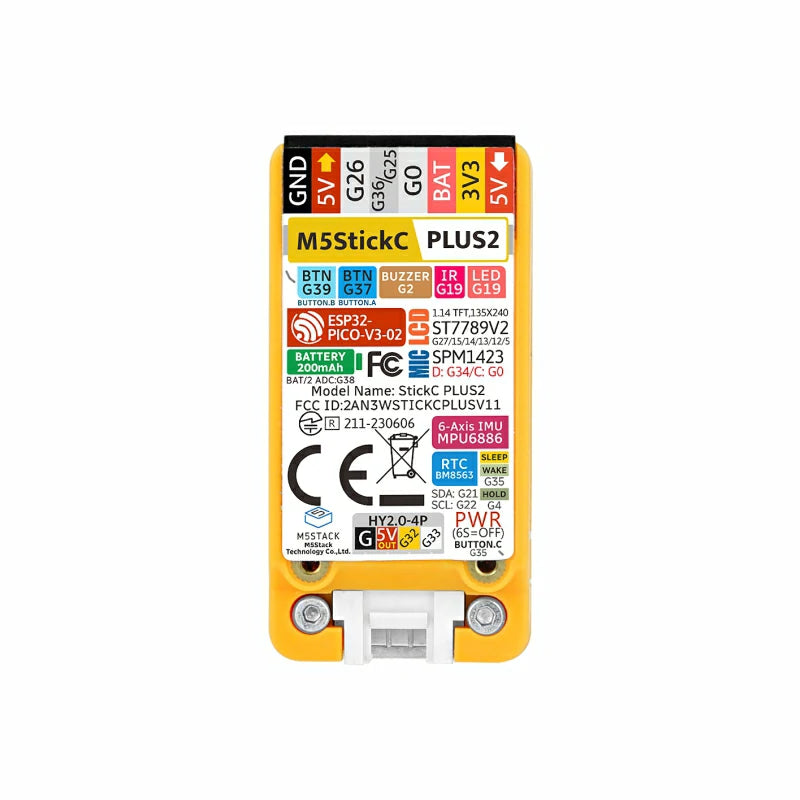

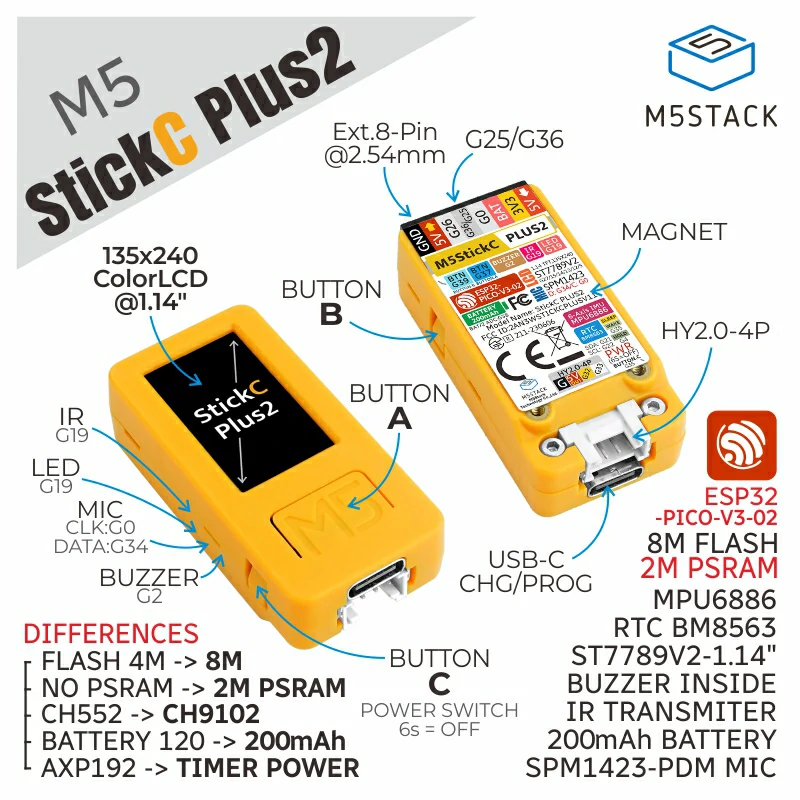
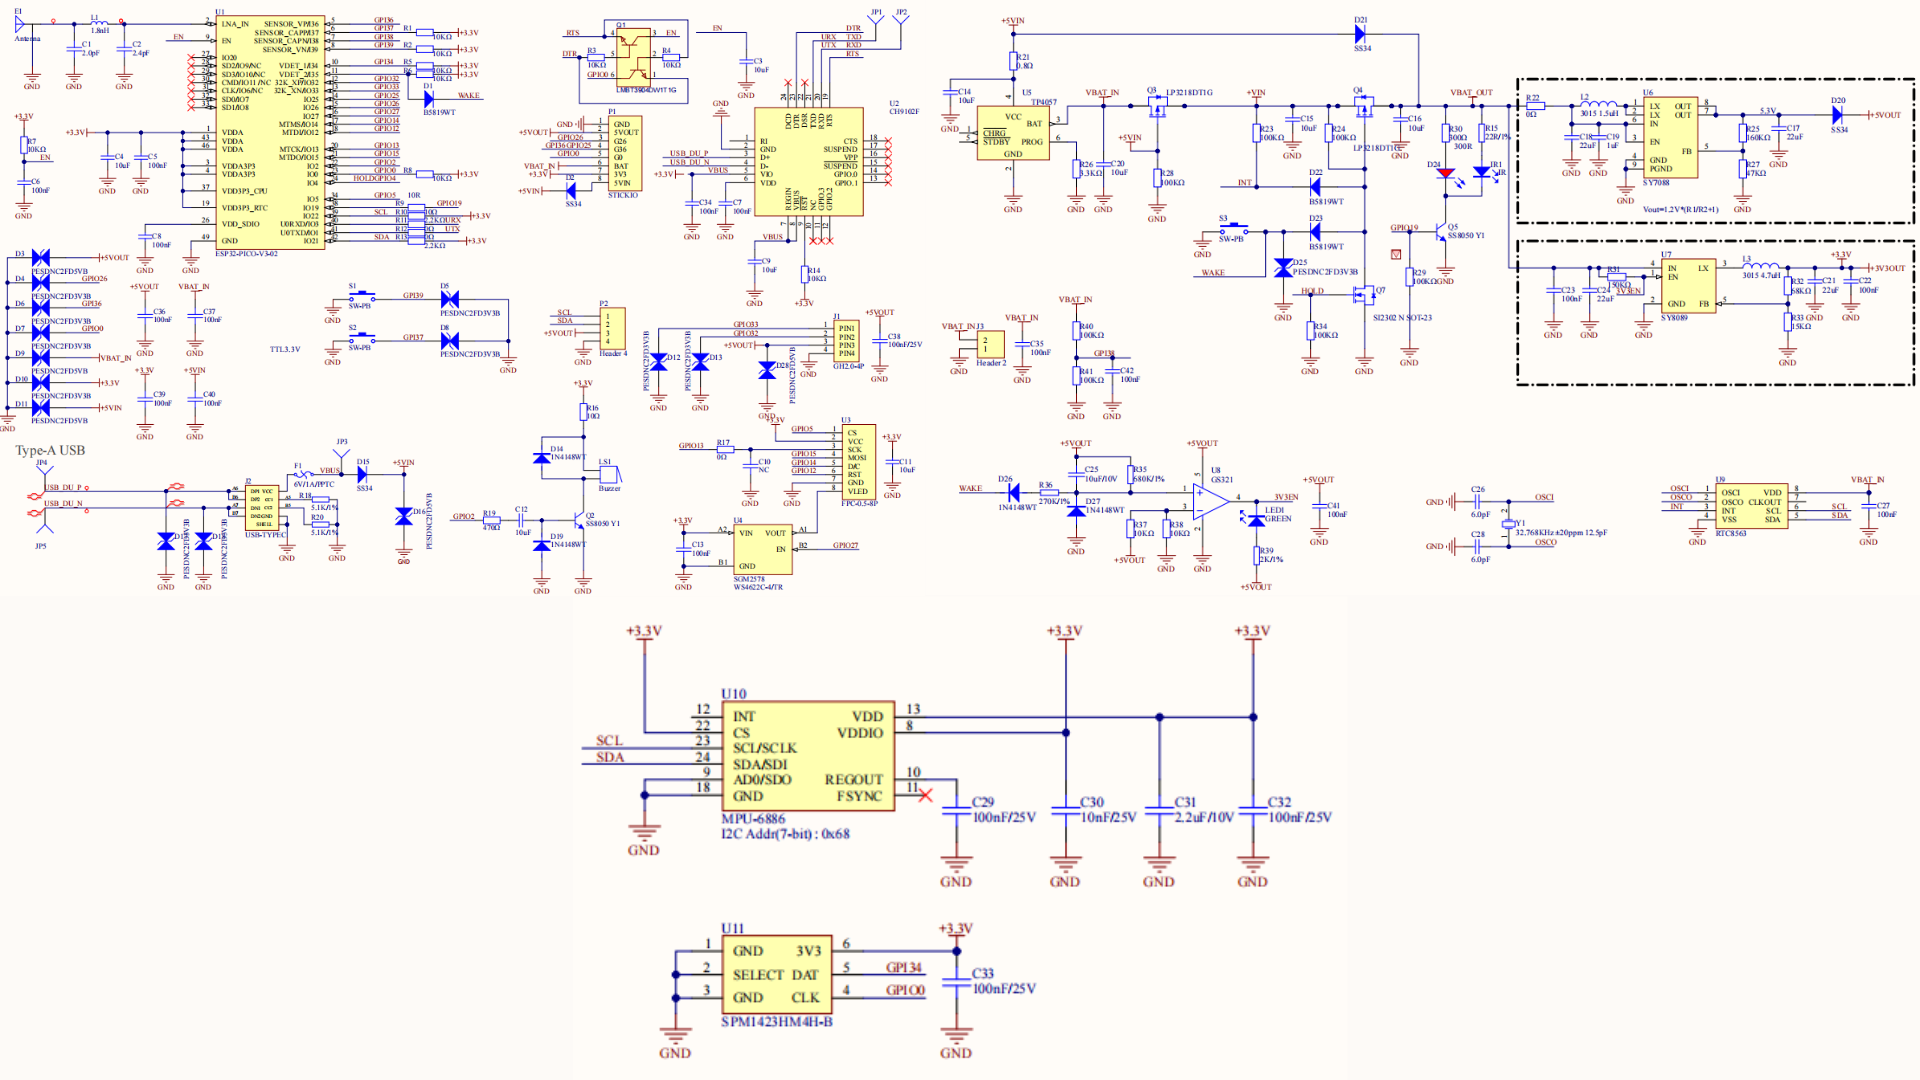
The M5StickC PLUS2 is a powerful IoT development tool based on the ESP32-PICO-V3-02 chip with built-in Wi-Fi functionality, making it ideal for IoT product prototyping. Compared to the M5StickC PLUS, the M5StickC PLUS2 offers enhanced performance, features, and battery life. Its compact form factor integrates a wide range of hardware resources, including an infrared (IR) module, RTC (Real-Time Clock), microphone, LED display, IMU (Inertial Measurement Unit), buttons, buzzer, and more.
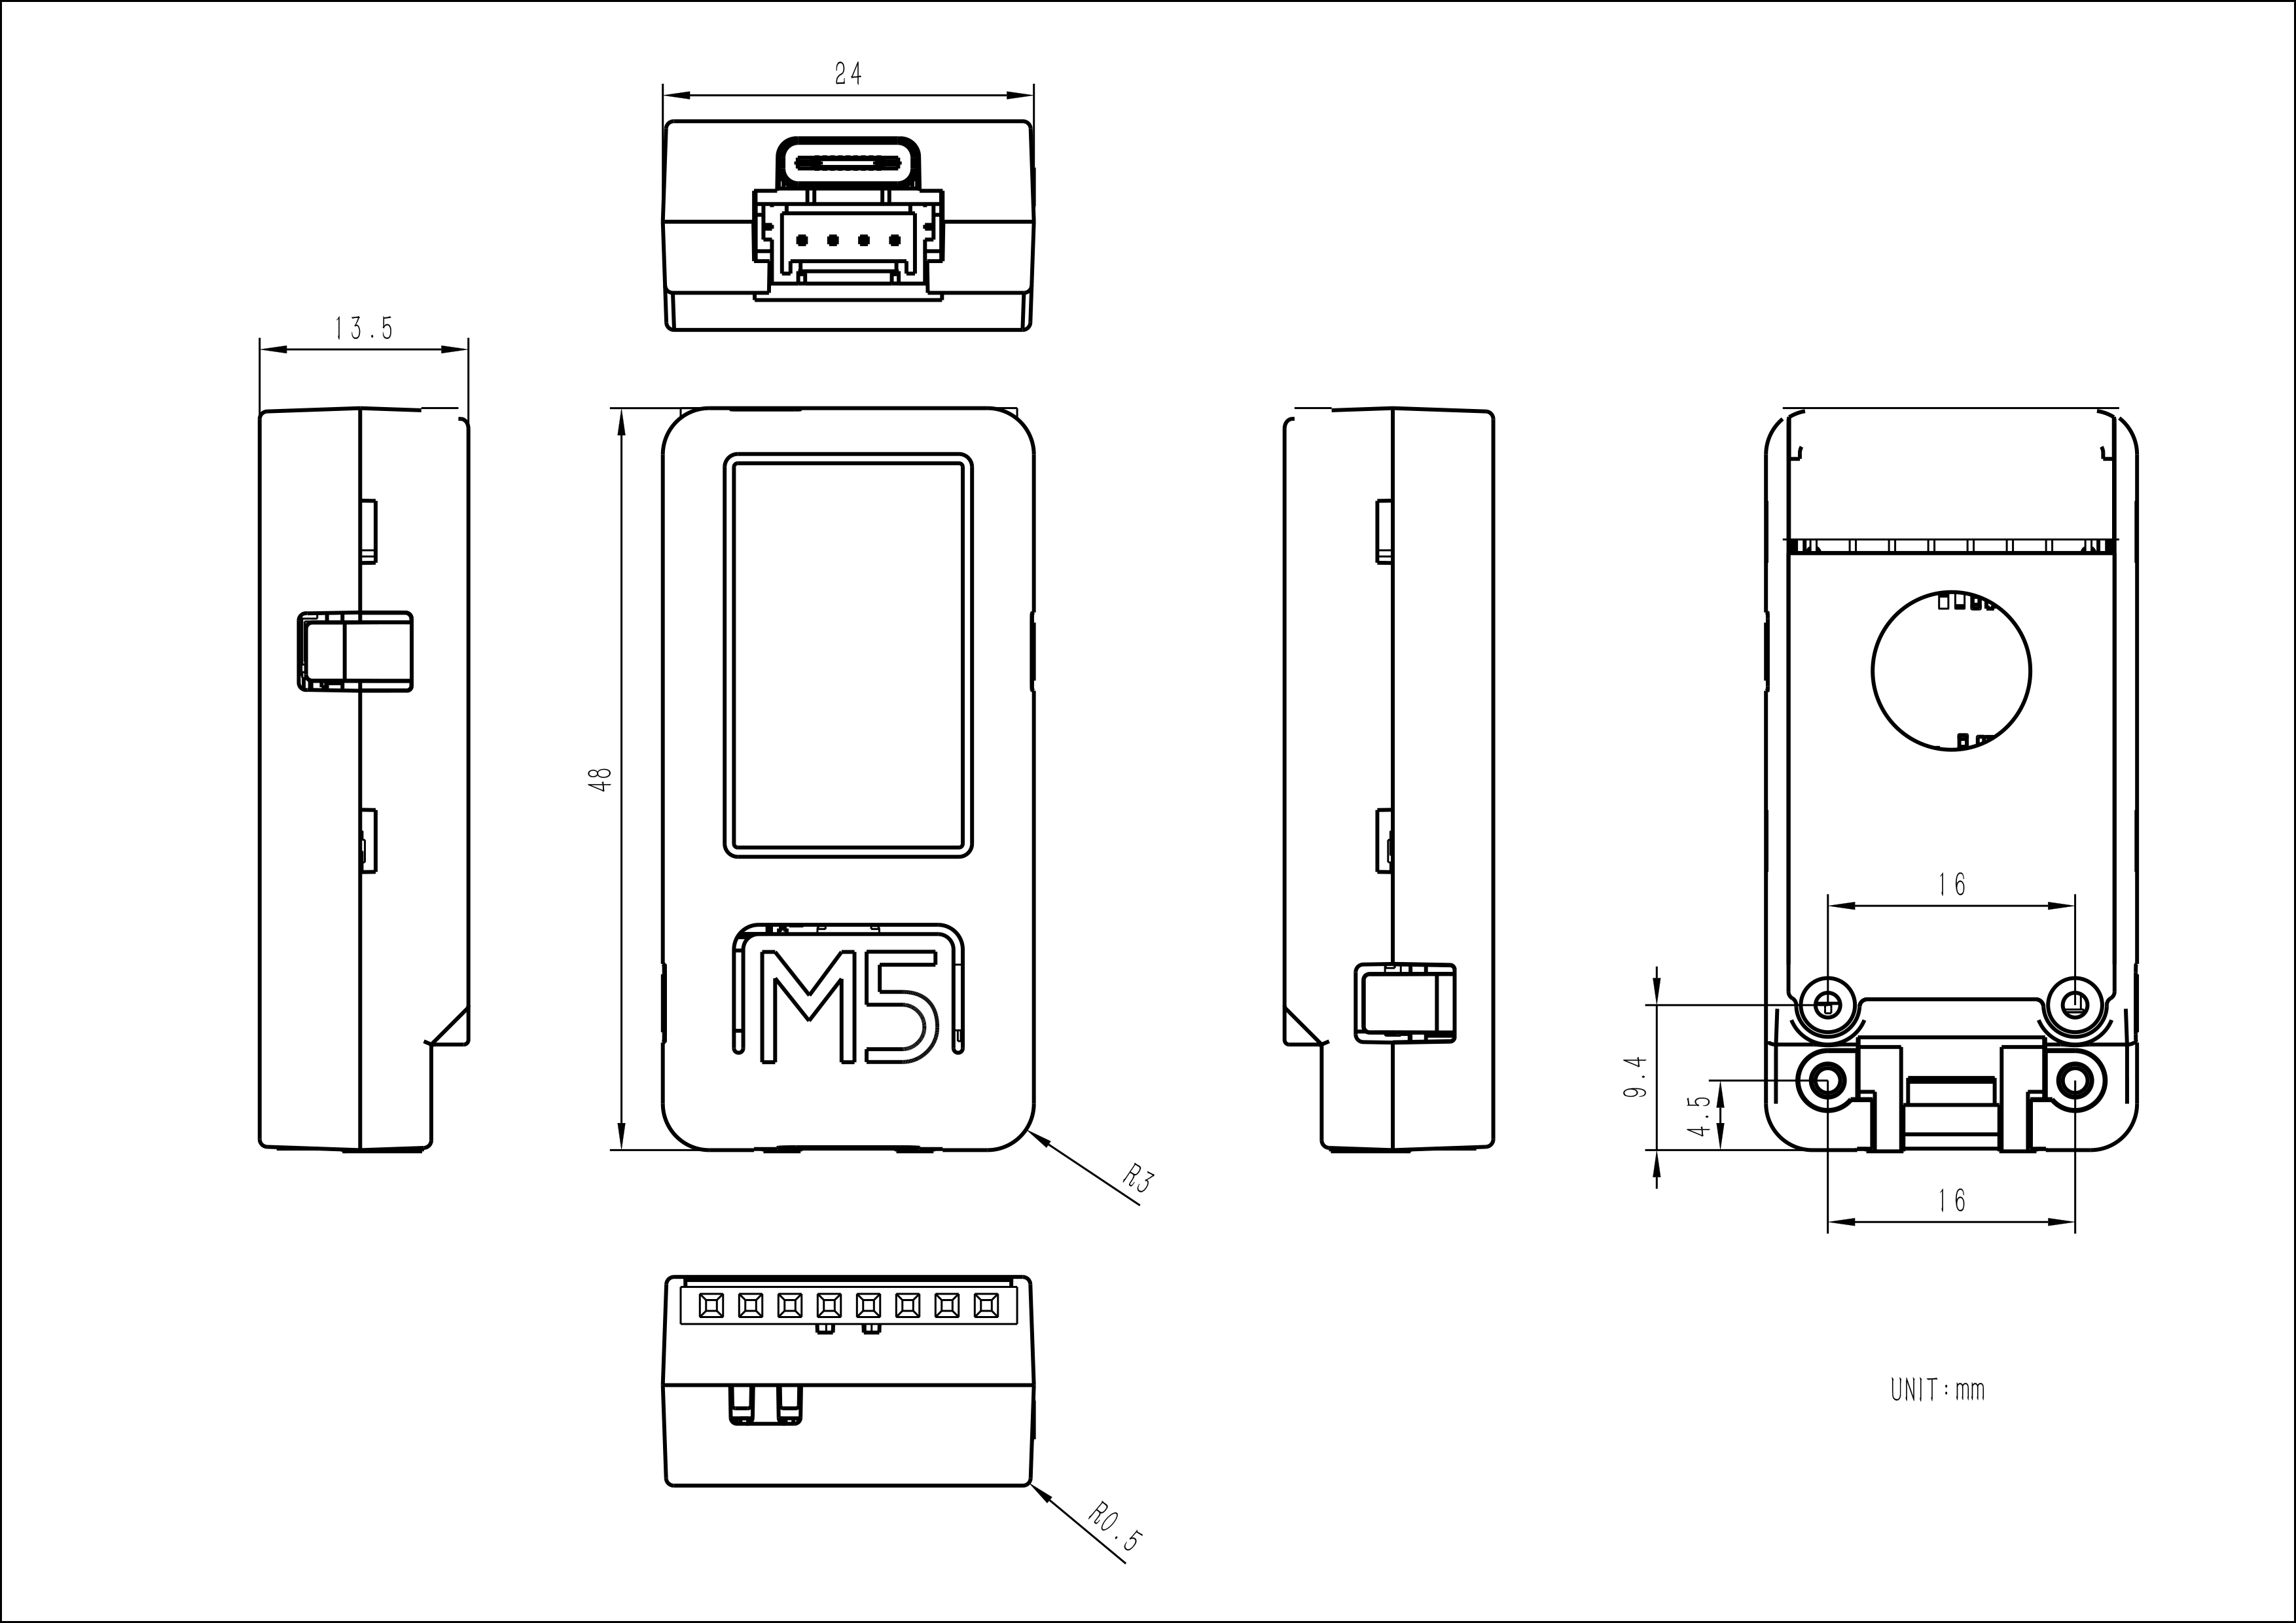
The M5StickC PLUS2 is equipped with a 1.14-inch TFT screen, offering a resolution of 135×240, driven by the ST7789V2 display driver. The battery capacity has been upgraded to 200mAh, providing longer operation time. It also supports HAT and Unit series expansion modules, giving developers greater flexibility. This device supports Arduino IDE and MicroPython programming, making it perfect for rapid prototyping, educational applications, and real-world IoT scenarios.
The M5StickC PLUS2 is a compact and versatile tool designed to spark unlimited creative possibilities for both beginner programmers and experienced developers.
Related Articles
What is the M5Stack M5StickC PLUS2 ?
Features
- ESP32-PICO-V3-02-Base,support WiFi
- Built-in 6-Axis IMU
- IR transmitter
- Microphone
- RTC
- Buttons, LCD(1.14 inch)
- Built-in Lithium Polymer Battery@200mAh
- Extendable Socket
- Built-in Passive Buzzer
- Wearable & Wall mounted
- Compatible with multi-platform development:
How do I turn off my M5StickC PLUS2?
To power on the device, press and hold “Button C” for more than 2 seconds, or trigger the IRQ signal by the RTC regularly. After triggering the wake-up signal, set the HOLD (GPIO4) pin to a high level (1) during program initialization to maintain the power supply. Otherwise, the device will enter the shutdown state again.
Power off:
When no USB external power supply is available, press and hold “Button C” for more than 6 seconds. Alternatively, when there is no USB external power supply, set HOLD (GPIO4) to 0 during program operation to power off the device. When the USB is connected, press and hold “Button C” for more than 6 seconds to turn off the screen and enter hibernation mode, but not power off the device.

Applications
- Internet of things terminal controller
- Wearable devices
- Stem education product
- DIY creation
Arduino
Version Change
| Release Date | Product Change | Note: |
|---|---|---|
| / | Initial public release | / |
| 2021.12 | Added hibernation and wake-up functions, and changed version to v1.1 | / |
| 2023.12 | The power management chip AXP192 was cancelled, and the main control chip was changed from ESP32-PICO-D4 to ESP32-PICO-V3-02, and the switching mode was different | The version is changed to v2 |
What the difference between M5StickC PLUS and M5StickC PLUS2
![]()
Hardware difference
| Product Name | SoC | Power management | Battery Capacity | Memory | UART Chip | Body Color |
|---|---|---|---|---|---|---|
| M5STICKC PLUS | ESP32-PICO-D4 | AXP192 | 120mAh | 520KB SRAM and 4MB Flash | CH522 | orange red |
| M5STICKC PLUS2 | ESP32-PICO-V3-02 | \ | 200mAh | 2MB PSRAM and 8 MB flash | CH9102 | orange |
Pin difference
| Product Name | IR | LED | TFT | BUTTON A | BUTTON B | BUTTON C(WAKE) | HOLD | Battery Voltage Detection |
|---|---|---|---|---|---|---|---|---|
| M5STICKC PLUS | G9 | G10 | MOSI(G15) CLK(G13) DC(G23) RST(G18) CS(G5) | G37 | G39 | Normal buttons, non-programmable | / | Read via AXP192 configuration |
| M5STICKC PLUS2 | G19 | G19 | MOSI(G15) CLK(G13) DC(G14) RST(G12) CS(G5) | G37 | G39 | G35 | G4 | G38 |
The difference between turn on and off
| Product Name | Power on | Power off |
|---|---|---|
| M5STICKC PLUS | Press the reset BUTTON (BUTTON C) for at least 2 seconds | Press the reset BUTTON (BUTTON C) for at least 6 seconds |
| M5STICKC PLUS2 | It can be started by pressing “BUTTON C” for more than 2 seconds, or IRQ signal triggered by RTC regularly. After triggering the wake up signal, it is necessary to set the hold(G4) pin to high level (1) in program initialization to maintain the power supply, otherwise the device will enter the shutdown state again. | When no USB external power supply is available, press BUTTON C for more than 6 seconds. Or when there is no USB external power supply, set HOLD(GPIO4)=0 in the program operation, that is, to achieve power off. When the USB is connected, press the “BUTTON C” button for more than 6 seconds to turn off the screen and enter the hibernation state, but not power off. |
Since M5StickC PLUS2 has cancelled the PMIC power management chip AXP192, the switching mode will be different. As mentioned in the beginning of the article, the operation is the same, so the library files supported by the program will also be different. Both the Wi-Fi signal and the infrared signal are stronger than before.
Frequently Asked Questions (FAQs)
1. What is the use of M5StickC PLUS2?
The M5StickC PLUS2 is a versatile IoT development tool designed for rapid prototyping. It is ideal for creating smart devices, interactive applications, educational tools, and smart home projects. Whether you’re a beginner or an experienced developer, the M5StickC PLUS2 makes it easy to quickly build and test IoT applications and integrate them into real-world use cases, with support for various expansion modules and a range of functions.
2. What is the difference between M5StickC PLUS and M5StickC PLUS2?
While both devices share a similar form factor, the M5StickC PLUS2 is an enhanced version of the original M5StickC PLUS.
Key differences include:
- The M5StickC PLUS2 features the ESP32-PICO-V3-02 chip, offering improved performance and Wi-Fi connectivity.
- The M5StickC PLUS2 has a higher 200mAh battery for longer-lasting power.
- The M5StickC PLUS2 integrates more hardware resources such as a microphone, buzzer, and IR transmission functionality, giving it a broader range of applications.
3. Does the M5StickC PLUS2 have IR?
Yes, the M5StickC PLUS2 is equipped with infrared (IR) transmission functionality, but it does not support infrared receiving functionality. This feature allows the device to send IR signals to control other IR-enabled devices in your project.
Reviews
There are no reviews yet.